Right Hand Mount for Toyota Prado Yrs:22-23 With Pre-Drilled AMPS Pattern Holes
  • SKU: 604803
  • Availability: in stock Many in stock Out of stock You can purchase this product but it's out of stock

Right Hand Mount for Toyota Prado Yrs:22-23 With Pre-Drilled AMPS Pattern Holes

$49.50
  • Barcode:
DESCRIPTION +

THE MOUNT WITHOUT A HOLDER (Choose your Holder Separately)

  • Attach the Holder to the Mount using the screws provided.

NO HOLES, NO DRILLING

  • Mounts provide the platform to mount your devices without drilling holes or using glue.
  • No drilling, no vibration, no popping off!

EASY INSTALL

  • Easily self-installed. Instructions come with each mount. NO dismantling of the dashboard is required.

CUSTOM DESIGN IN SWEDEN

  • Manufactured using CNC Robotics. They are custom-designed for each vehicle to produce a solid and secure fit.

Features

  • The Mount without a Holder
  • NO Holes, NO Drilling
  • Easy Install
  • Custom Design
  • Made in Sweden
This Mount Fits

Toyota Prado Year(s):10-23

SKU 604803
Barcode # 7320286048033
Brand ClicOn
Shipping Weight 0.1200kg


Below you will find the installation instructions for the Right Hand Mount (SKU:604803), you can click on the images to open a larger version in a new tab

Installation Image

Step 1

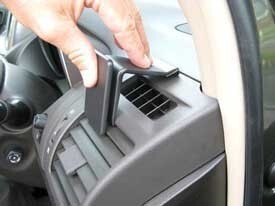
1. Use the enclosed alcohol pad to clean the area where the ClicOn is to be installed. Peel off the adhesive tape covers on the ClicOn. Hook the angled edge on the lower part of the ClicOn under the upper edge of the air vent.

Installation Image

Step 2

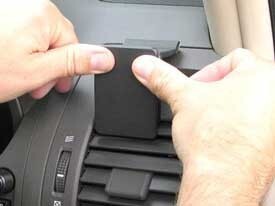
2. Press the ClicOn foward so the angled edge on the upper part hooks into the gap between the frame surrounding the air vent and the dashboard.

Installation Image

Step 3

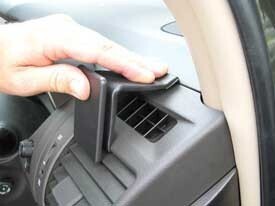
3. Press downward on top of the ClicOn so the angled edge goes all the way into the gap.

Installation Image

Step 4

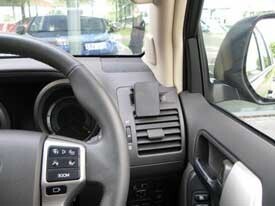
4. The ClicOn is in place.


Customer Reviews

Be the first to write a review
0%
(0)
0%
(0)
0%
(0)
0%
(0)
0%
(0)
BACK TO TOP